Here’s how to turn off alerts for new emails in Outlook so you can work without interruptions. If needed, you can then re-enable notifications for specific important emails—for example, from your boss.
Benefits of using alerts selectively
When you selectively turn email notifications on and off, you work more productively. Fewer distractions mean more focus and less stress.
Focused work: You won’t be constantly interrupted by emails that can wait or aren’t important.
Prioritization: You won’t miss important emails because you can set targeted notifications (which you’ll notice more consciously because Outlook shows fewer, less frequent alerts instead of three hundred times a day).
Time management: You can handle emails in batches/in one block—less annoying, and you’ll be done faster.
Have you ever thought about how often unnecessary email notifications interrupt you? If you use alerts selectively, you’ll work more efficiently and have more time for important tasks.
Disable alerts for new Outlook emails
How to turn off the alert for new emails:
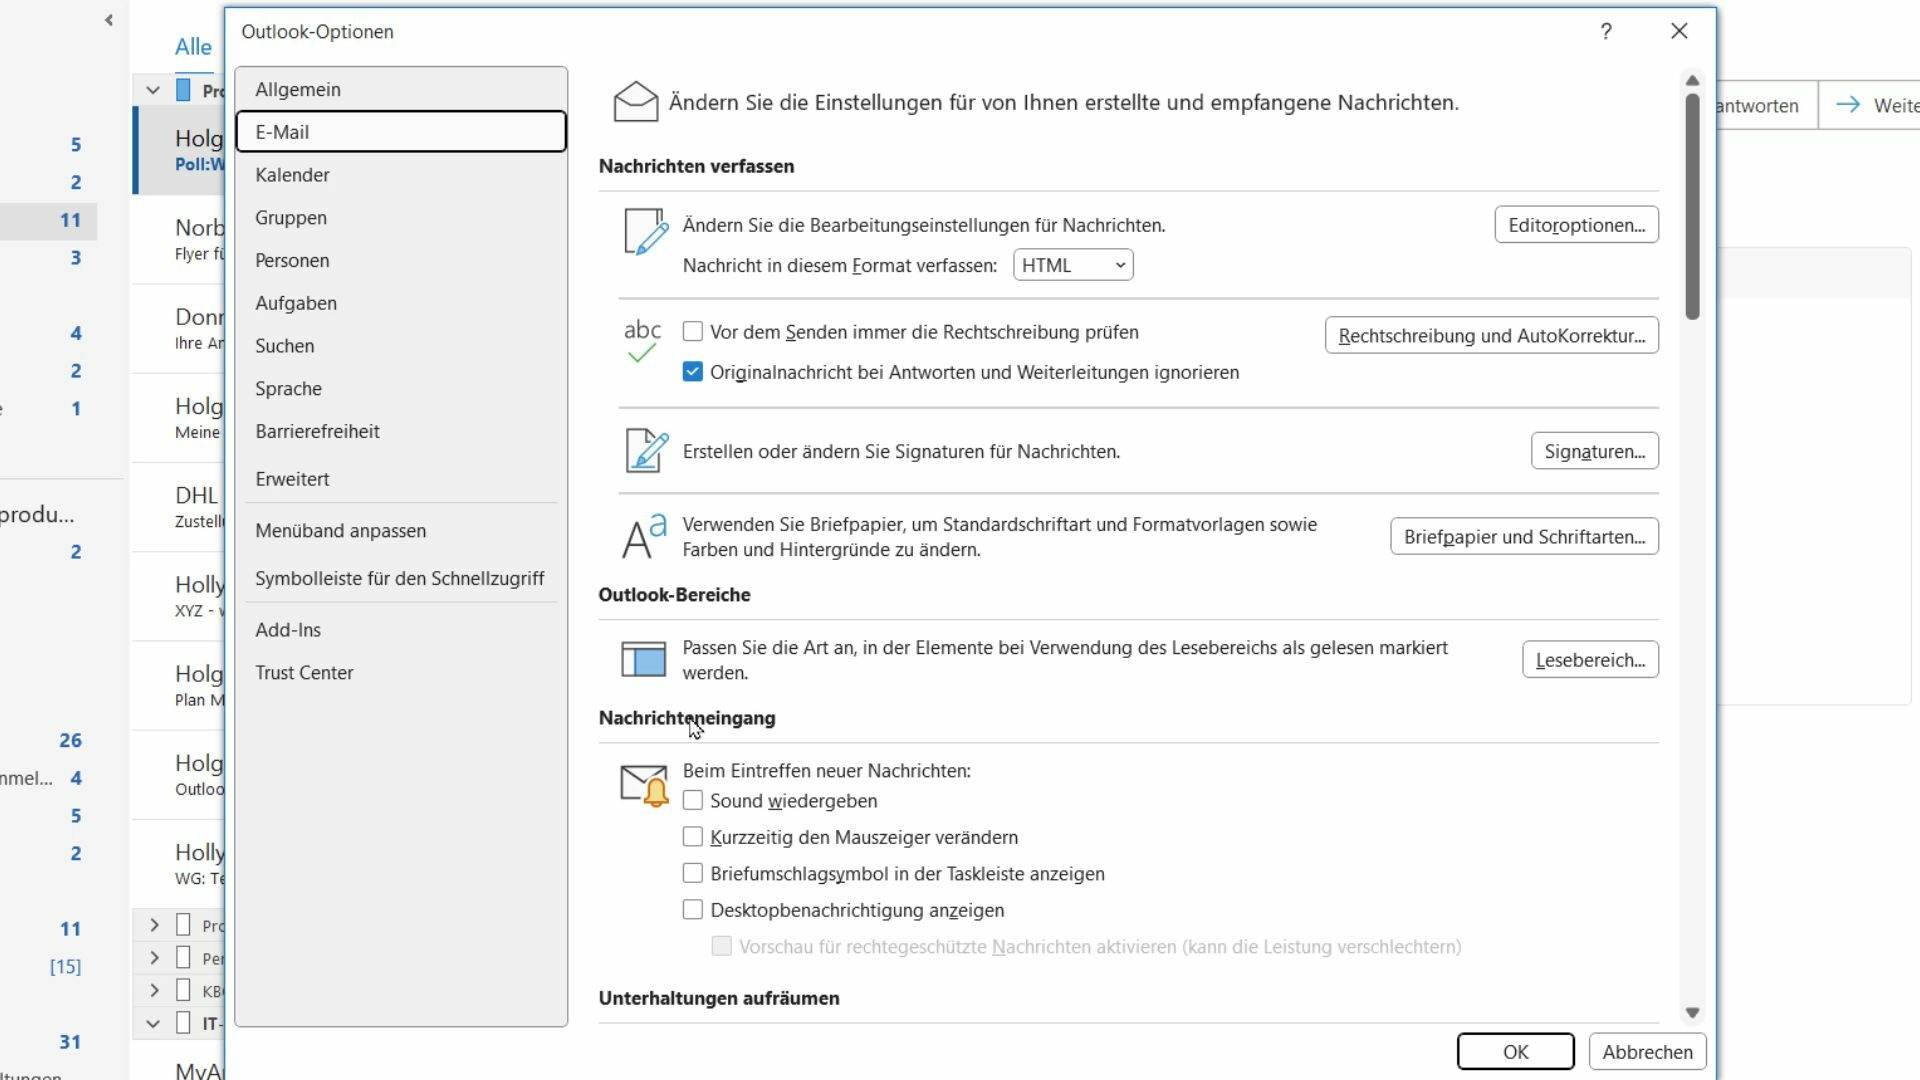
Click „File“ (far left on the Outlook ribbon).
Then select „Options“ (bottom left)…
…and in the Outlook Options that open, select „Mail“ at the top left.
Scroll down to the „Message arrival“ section.
Clear the checkboxes for the following options to disable all notifications:
„Play a sound“
„Change the mouse pointer“
„Show an envelope icon“
„Display a Desktop Alert“
These settings prevent you from being disturbed by unimportant emails. Confirm with OK.
Re-enable desktop notifications for specific emails
Sometimes there are emails that require your immediate attention—for example, messages from your boss. Here’s how to re-enable notifications for specific senders:
Find an email from the sender (e.g., your boss).
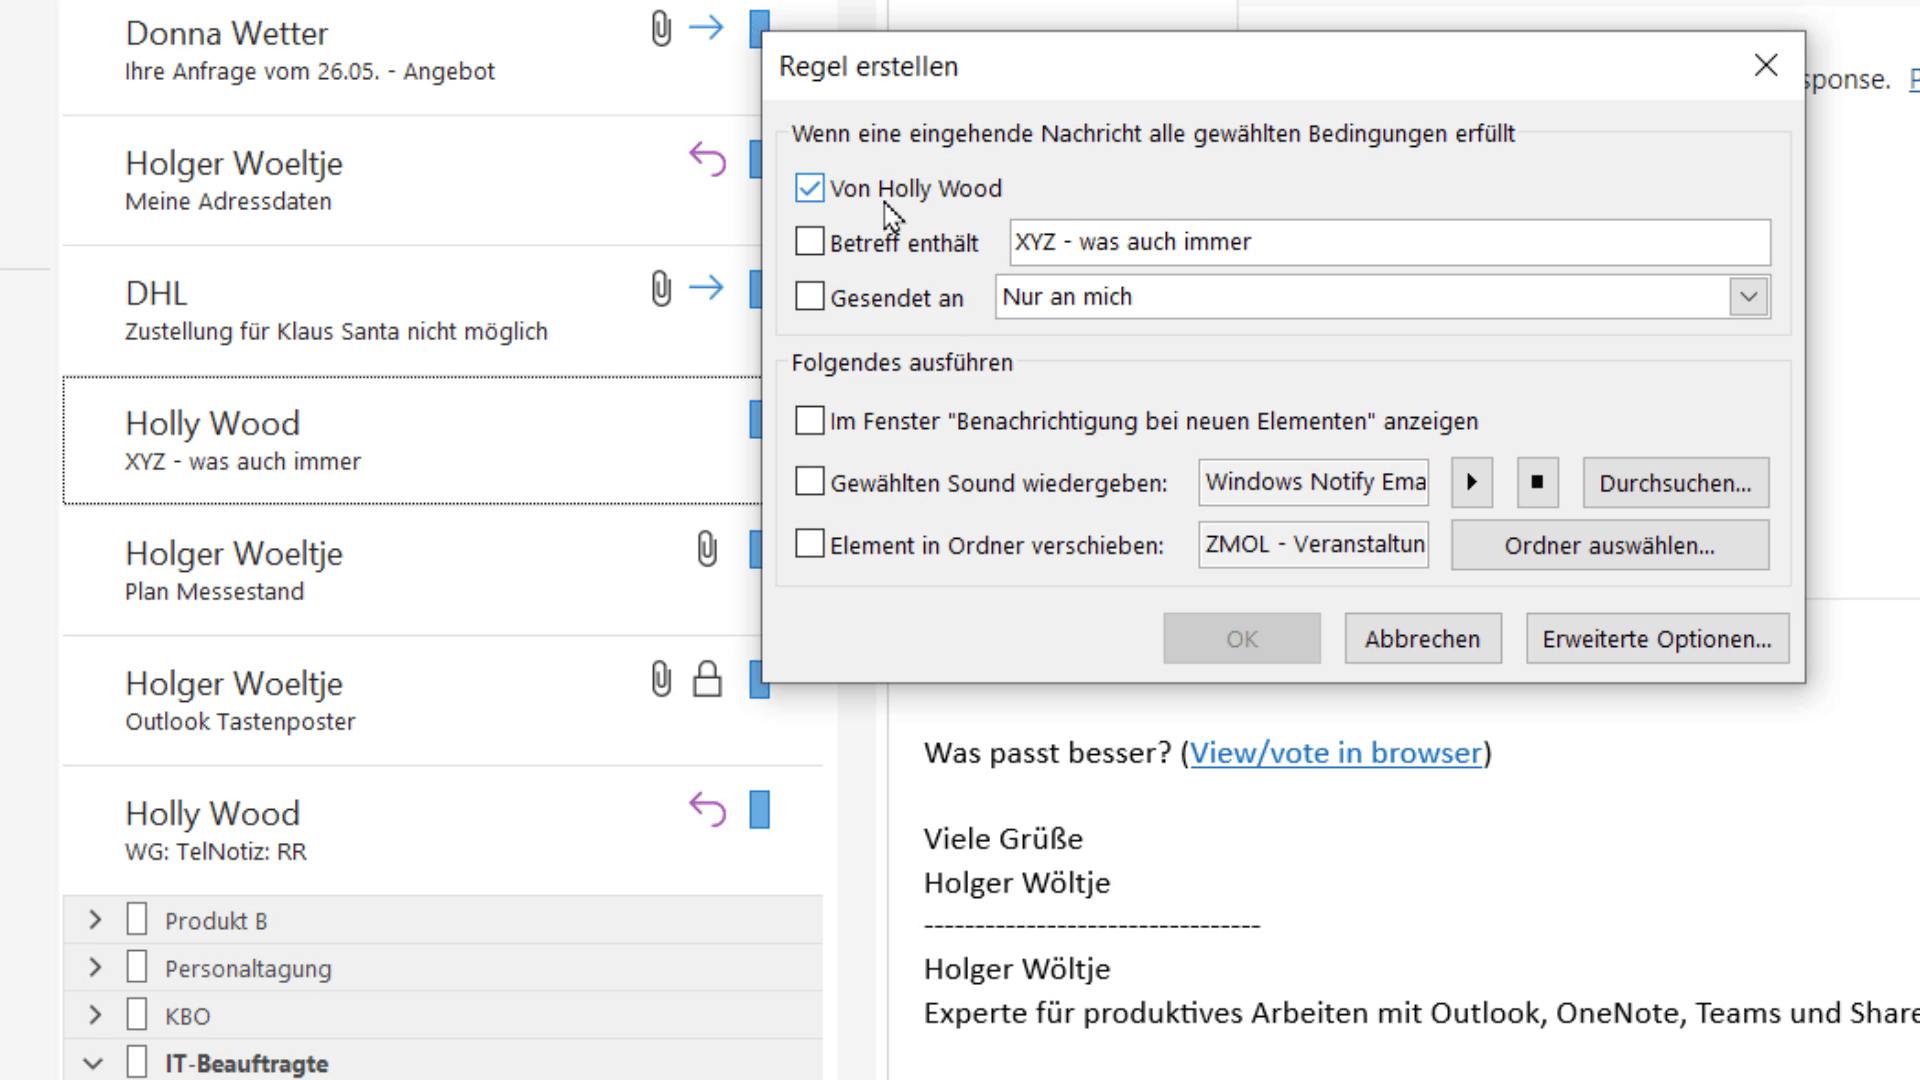
Right-click the email and choose „Rules“ > „Create Rule“ from the context menu.
Outlook automatically uses the sender and subject of the email you clicked and opens a new „Create Rule“ dialog box. Here you define which emails the rule should run for:
„From…“ / sender: Select the relevant person here (the sender of the email you right-clicked to create the rule is already entered, e.g., „From Holly Wood“. Simply tick the checkbox—see screenshot—to apply the rule only to emails from this person).
„Do the following“ (select action): Here you can specify which notification you want to receive, for example „Play the selected sound“ or „Advanced Options“ to set more details and select „Display a Desktop Alert“.
Example:
If your boss marks important emails with the subject „URGENT“, you can create a rule that plays a sound only for those emails:
Enable „Subject contains“.
Enter the word „URGENT“.
Select the notification you want.
Confirm with „OK“ to save the rule. From now on, you’ll only receive a notification for these specific emails.
Transcript (expand to read)
00:00-05:17
Easily dictate text in Outlook, OneNote, and Microsoft Word—no extra software, no special hardware, no training.
Welcome—my name is Holger Wöltje. For over 20 years, I’ve been helping people work more productively with Office. And Office 365 includes a dictation feature that most people still haven’t discovered. Fifteen years ago, we were always promised this.
We could use great tools to dictate everything into the computer. It was expensive, it was time-consuming, and we had to train for hours. Some people already thought that was great. But most people—just like with Siri, and whatever Android dictation they had—ended up tossing it aside in frustration. That has changed radically in recent months. It’s amazing how well it works with Office 365.
You can see it’s already typing along here while I speak. How does it work? If you have Office 365, just open, for example, a new Outlook email. And it works the same way in a Word document or anywhere in the text on a OneNote page. You’ll find it right on the tab that’s usually open first, on the ribbon. When you’re writing or replying to an email, that’s the Message tab, and in Word, when you’re in a new document, it’s the Home tab.
There you’ll find, rather inconspicuously hidden, a Language group with a cute little microphone icon for Dictate. Click it once—and if you know the keyboard shortcut Alt Ö—it opens a cute little floating mini toolbar to control your voice input. First, find it and drag it somewhere on the screen where you can see it without it getting in the way. You can move it anytime. On the left edge of this toolbar is a small microphone icon. And when it’s outlined in color, Outlook—or in Word, of course Word—is actively listening and transcribing your text live.
Click Dictate once on the ribbon. And if it’s not outlined in dark yet, click again—and to disable it, click again; then the dark outline disappears. You can always do the same with Alt Ö, Alt Ö, S—toggle on, toggle off, and so on. With the little gear icon on the bar, you can adjust a few settings, which may be important so it works for you at all.
First, there’s the microphone. You may have multiple microphones—if you have a laptop, it usually has a built-in mic. And on Lenovo and HP, for example, at least on the higher-end series, they work wonderfully for dictation. You probably already have a headset for video conferences that you can use, and maybe you have other microphones too. Just make sure you select the typical microphone you know works.
For example, because you use it regularly in video conferences. I also have several microphones to choose from here; for dictation, the laptop microphone is completely sufficient—at least here on my wonderful Lenovo P1. And you can already see it moving here.
That means a signal is actually coming in. It can also happen that a cable isn’t connected, a switch isn’t enabled—or the other way around, the mute switch is enabled. I’d recommend turning on automatic punctuation; it works very well.
And if, for example, you don’t want Schimanski’s favorite word in the printed text, you can of course filter profanity. Spoken language is probably German. If you understand this video, make sure it’s selected correctly. You can also dictate three or four English expressions—these come up again and again in today’s business German, as they say, and especially in technical contexts. They’re recognized extremely well.
If it turns into several sentences of English, it can look funny if the software is actually expecting German. You can change that—not only between German and English, but also to any language you installed with Windows. For recognition, I can do a bit of Spanish and Turkish, and that works wonderfully. If I try to say hello in Chinese—ni hao—everyone always says hello back.
I tried saying thank you once, and everyone looked at me angrily. I think it depends a lot on intonation and speech rhythm. Let’s stick with German. Just click Save, and then you know—arm the microphone icon once, start dictating, and off you go.
Dear Sir, example new paragraph?
Instead, you can also say New line—this is how wonderfully you can dictate with Office. It’s really fun. Just try it out for yourself—you don’t always have to type.
And the nice thing is: when you dictate something, you don’t get spelling mistakes—at most, speech recognition errors. But those are relatively rare. And I have to say, I find it absolutely phenomenal, even without training. Just give it a try. I feel like we’ve finally reached the point with this technology that we always wished for 20 years ago. And it really works very well now—as long as you don’t try it right in the middle of boarding a plane or an ICE train. Have fun typing, save time and nerves, and see you in the next tip.
FAQ
How do I disable all email notifications in Outlook?
On the ribbon, select „File -> Options -> Mail“ and clear all checkboxes under „Message arrival“ (see details above).
Can I enable notifications only for specific senders?
Yes. Right-click an email from the sender you want and define a rule via „Rules -> Create Rule“ (the sender is already preselected. Set the notification and confirm with „OK“).
What should I do if I need quiet time but still don’t want to miss urgent emails?
Use a rule to set up desktop notifications only for important senders or specific keywords in the subject line. That way you can stay undisturbed and still won’t miss important messages.
How do I create a rule for emails with certain words in the subject line?
When creating the rule, select „Subject contains“ (or in Advanced Options „with specific words in the subject“) and enter the word you want.
Why should I disable the alert feature?
Constant email notifications interrupt your work and reduce your productivity. Turning them off helps you stay focused.
In short: Use Outlook’s notification features wisely and tailor them to your needs. That way you stay on top of your emails and work more effectively instead of constantly getting distracted. Give it a try and enjoy the peace and quiet at work!